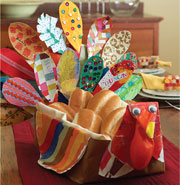
Kid's Thanksgiving Crafts Turkey Centerpiece
Large brown paper bag
Piece of corrugated cardboard
Paper plates
Stapler
Mod-Podge glue
Colored paper
Orange or red balloon and googly eyes
Glitter, stickers, or other notions
Craft clothespins
Tacky glue
Time needed: About 1 Hour
1. The Turkey's Body:
Trim the bag so that it measures about 8 inches tall. Then fold down the sides so that they are half the height and double the thickness. Cut the cardboard to fit in the bottom of the bag and insert it. Next, fold a paper plate in half and fit it inside the bag where the tail will go, bending the sides as needed.
2. Staple the plate in place. Then staple a second plate (don't fold this one) to the outside of the bag behind the first plate. For wings, fold 2 paper plates in half and staple one to each side so the bag is sandwiched between it.
3. For the turkey's head, fold and staple another paper plate, as illustrated. Decorate all the paper plates, including the head, by gluing on torn bits of colored paper. Then add a balloon wattle and googly eyes.
4. The Feathers:
Have your kids glue colored paper shapes on paper plates, layering different prints or creating bold patterns if they like.
5. When the glue is dry, cut feather shapes out of the plates and stick a craft clothespin to the back of each with tacky glue so your child can attach the feathers to the paper plates. For an extrafancy finish, they can add decorative notions or even their names.
posted by Andrea at 5:23 AM
![]()
0 Comments:
Post a Comment
<< Home