Kid's Thanksgiving Crafts Turkey Chair Slipcovers

Kid's Thanksgiving Crafts Turkey Chair Slipcovers
1. The Slipcover: This easy slipcover, made from a few yards of felt, serves as a backdrop for a year's worth of decorations.
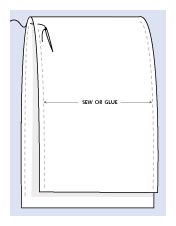
First, decide how far down the back of your chair you want the slipcover to hang. Measure from that point up and over the top of the chair, then down to the seat (or stop at the arms if your chair has them). This is the total length of felt you'll need for each cover. Now measure the width of the chair back at its widest point; add to that measurement the thickness of the chair back and 1 inch for the seams (1/2 inch per side).

2. For each chair, cut a piece of white felt to fit your measurements. Ours ran 1 1/2 yards long and 2/3 yard wide.
3. Fold the felt over the chair and pin the sides in place. Remove the cover and sew up the sides or glue them together with fabric glue. If you sew them, turn the cover inside out.
 4. The Decorations
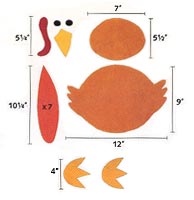
Young helpers will get a kick out of arranging the feathers on this pleasantly plump bird. Download turkey template 1, turkey template 2, and turkey template 3.
(To view the .pdf files, you'll need Adobe Reader which is available for free from the Adobe site.)
5. Once they're in place, stick on the rest of the turkey's body parts. Trace the templates on to felt (or other lightweight materials such as ribbon) and then cut them out. Dimensions will depend on the size of your chair covers.
6. Spray the back of each piece with a thin layer of repositionable glue, then press them onto the slipcovers or layer them on top of one another. (If little hands peel off any of them, just apply another layer of glue and press them back on.) Tip: If you get a clump of glue, spread it out with a paintbrush so it doesn't leave a mark on the white felt.
7. Store the pieces in plastic bags, preferably with the sticky sides facing away from one another. Next time you use them, spritz on another layer of glue.
0 Comments:
Post a Comment
<< Home