Kid's Thanksgiving Crafts Turkey Napkin Ring
Kid's Thanksgiving Crafts Turkey Napkin Ring

Flat wooden craft spoons
Tempera or acrylic paints
Paper towel tube
Scissors
Orange pipe cleaners
Black marker
Tacky glue
Red felt
Time needed: Under 1 Hour
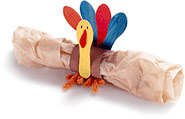
1. Five craft spoons are required for each ring. Using tempera paint, color one of them yellow for the turkey's head, the others, a variety of colors (they'll be used for tail feathers).
2. For the turkey's body, cut a 2-inch section from a cardboard paper towel tube and paint it brown.
3. From orange pipe cleaners, shape a pair of short legs with three-toed turkey feet. Fit the legs through small holes in the cardboard tube, bending the tips inside the tube to secure them.
4. Use a marker to draw eyes on the face and use tacky glue to attach a red felt wattle.
5. Finally, glue the head to the front of the body and the tail feathers to the back.
Flat wooden craft spoons
Tempera or acrylic paints
Paper towel tube
Scissors
Orange pipe cleaners
Black marker
Tacky glue
Red felt
Time needed: Under 1 Hour
1. Five craft spoons are required for each ring. Using tempera paint, color one of them yellow for the turkey's head, the others, a variety of colors (they'll be used for tail feathers).
2. For the turkey's body, cut a 2-inch section from a cardboard paper towel tube and paint it brown.
3. From orange pipe cleaners, shape a pair of short legs with three-toed turkey feet. Fit the legs through small holes in the cardboard tube, bending the tips inside the tube to secure them.
4. Use a marker to draw eyes on the face and use tacky glue to attach a red felt wattle.
5. Finally, glue the head to the front of the body and the tail feathers to the back.
posted by Andrea at 10:09 PM
![]()
0 Comments:
Post a Comment
<< Home